Marauder
|
|
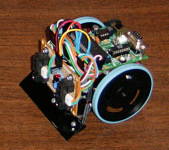
Marauder is my first non-lego Mini-Sumo Robot.
It started out as a kit called the
Mark III available from the
Portland Area Robotics Society.
I highly recommend this kit as an excellent starting place for anybody
interested in getting into robotics. It is very expandable and very cost
effective.
A Mini-Sumo robot needs to fit in a 10cm square tube and
weigh under 500 grams. The official Mini-Sumo
rules
are available from the Seattle Robotics Society.
Well, I finally decided to post Marauder's source code.
Marauder.zip contains all of the source, along
with the Makefile. The makefile is setup to run under cygwin, and you'll
probably need to modify paths to make it build.
|
|
|
|
First Appearance
Marauder made its first appearance at the North West Robot Sumo Tournament.
At the time his name was called "Blue" after the tires. I received
the kit two weeks before the competition. It took one evening to assemble
the kit and the remaining two weeks to program it. Unfortunately Blue was
eliminated by its first two opponents: Goliath and RAM. Sigh.
Bigger...
|
|
|
|
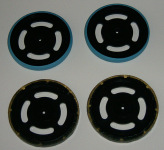
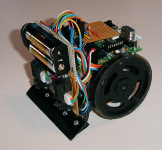
New Tires
After the NWRST, I decided to make some tires which had more grip. You can
see the original tires at the top, with blue elastic bands around a hard
plastic hub. I filed the half circles using a circular file to make sure
that the tire didn't slip.
Bigger...
|
|
|
|
|
|
|
Waiting to compete at Robothon
This picture was taken by Rick Washburn at Robothon. Here Marauder is
sporting the new grippy tires, and a couple more batteries. I mounted the
batteries over the scoop to give more weight on the front, and to provide
more speed. There are 6 NiMH AA cells for the motors, and a 9v battery for
the controller.
Bigger...
|
|
|
|
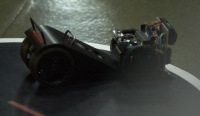
Marauder meets Goliath
Another picture taken by Rick Washburn of a rather unfortunate encounter
with Goliath. At Robothon, Goliath beat Marauder, Marauder beat RAM, and
RAM beat Goliath. Nemesis beat them all. By luck of the draw, Marauder
took 2nd place.
Bigger...
|
|
|
|
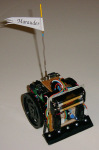
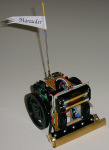
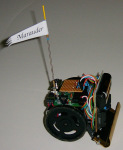
Marauder at the WCRG
Marauder got a flag, and a couple more line sensors (one for each of the
the screws you see at the top of the scoop), as well as some additional
electronics for the additional line sensors.
Bigger...
|
|
|
|
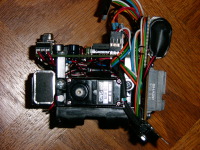
Right View
I removed the mounting tabs from the line sensors, and bolted the AA cell
holder directly to the chassis. This allowed the battery holder to be moved
up and forward. The most significant advantage is that the battery holder
no longer projected out the back, disturbing the wheel profile. This means
that Marauder can be tilted back quite far before losing traction.
Bigger...
|
|
|
|
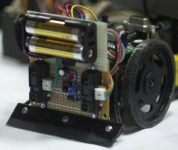
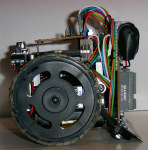
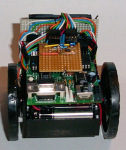
Marauder Internals
Here's the same view as above, but with the wheels removed. I used some
small pieces of magnet wire to help organize the wires. The magnet wire
over the servos was originally to keep some weights in place, and to keep
the servo sires from getting into the wheels. Since I added the batteries
on the front, I don't need any extra weight.
Bigger...
|
|
|
|
Front Sensors
This is the front view, and you can see the main sensors. Click on the link
for more details.
Details...
|
|
|
|
Bottom View
Here you can see the five line sensors. Only the outer two are used for
Mini-Sumo. All five are used for line following. Click the link to see
more information about how the battery case was mounted.
Details...
|
|
|
|
Rear View
Here you can see a better view of the circuitry for the extra line sensors.
I also added a couple of slide switches. You can see one of them just above
and to the right of the brown circuit board. One of the switches toggles
between Mini-Sumo and Line-Following modes, and one of them provides an
initial Left/Right hint for the initial direction to turn in Mini-Sumo. I've
never actually used this feature, but it's there.
Bigger...
|
|
|
|
Left View
Nothing new here. You can see my attempts to keep all of the wires neat
and tidy. Click on the link to see more information about the line sensor
circuitry.
Details...
|
|
|
|
|
|
|
Ready for Line Following
An extra scoop was added for line following so that the Mini-Sumo scoop
wouldn't catch on the lines. The lines at the WCRG line following contest
were basically black electrical tape laid on a white surface.
Bigger...
|
|
|
|
|
|
|
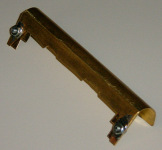
Line Following Scoop
This is a closeup the removable line following scoop. I made a paper
template of the outline of the line sensors and transferred this to the
brass tubing. Some careful cutting with tin snips and some filing gave
the finished outline.
Bigger...
|
|
|
|
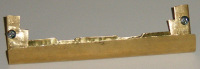
Bottom of the Line Following Scoop
Bottom view of the scoop. The nuts are soldered to the bottom. A screw comes
through a folded over piece of brass, which allows the scoop to friction
fit on the Mini-Sumo Scoop.
Bigger...
|
|
|
|
|
Home
- Line Maze 2006
|