Dave's CNC Setup
|
|
When I bought my Sherline mill and lathe, I got them with stepper motors.
I finally got around to putting together the controller for the steppers.
I still have a bit of wiring to do, but here are some pictures of the
progress so far.
|
|
|
|
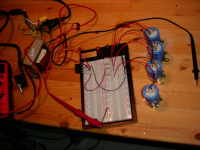
Condition Capacitors
When you use larger electrolytic capacitors, it's a good idea to condition
them first. This is especially true for capacitors which have been in
storage for a while, but isn't a bad idea for new ones either (because even
though they're new they'll start to degrade if they've been on the shelf
for a while). Conditioning helps to lower the leakage currents caused by
degraded electrolytic material.
Condition the caps by applying your supply voltage through a 1k ohm resistor.
Keep the voltage applied until the voltage drop across the resistor drops
to within 1-2% of the supply voltage for about an hour. This could take
up to 24 hours. Repeat using a 100 ohm reistor. If you're going to condition
multiple capacitors at the same time (as shown in the picture), use a
separate resistor for each one.
Bigger...
|
|
|
|
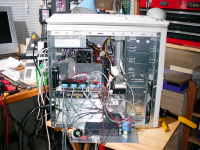
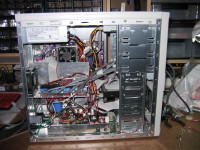
Computer Case
Here's an overall picture of the computer case that I'm using.
I bought the computer at The Canadian Computer Store
and only paid $288 Cdn for it. This is the Duron model, which should
be more than adequate for CNC work. I decided to put the stepper controller
and power supply in the case.
Bigger...
|
|
|
|
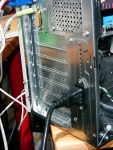
AC Power In
I added a power outlet for the power supply by drilling a couple of holes
and using a nibbler to get it to size.
Bigger...
|
|
|
|
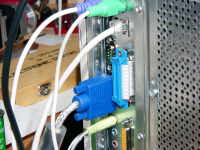
Parallel Port Connector
For the parallel port cable, I took the cable apart and threaded the ribbon
between the case and the connector. It's a little hard to see because there's
a reflection of the ribbon cable on the metal. If you look at the top
you can see where the gap really is.
Bigger...
|
|
|
|
Old Power Supply
Here's a picture of my power supply. I basically used a Dell laptop
power supply that I got for free (because the connector that plugged into the
laptop was broken). It's rated output is 20v DC @ 3.5 amps. You can see
where the edges are chewed up from me breaking it apart. I removed the proprietary 120v connector and soldered
wires directly to the circuit board for both the input and output. The
top half of the plastic lifts off, and the bottom half is screwed to the
aluminum plate. The terminal strip on the left is where the 120v AC comes
in, and the long gray thing with the red connectors on it is a fuse. The
terminal strip on the front edge is for a lighted on/off switch (which
is visible in the Connectors picture). The power supply will just sit in
the bottom of the computer case.
Bigger...
|
|
|
|
New Power Supply
The Dell laptop power supply was only ever intended to be temporary. I
picked up a 24v 10A switching supply from somebody on another Yahoo group
for $20 (including shipping).
Bigger...
|
|
|
|
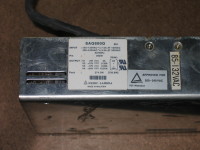
Power Supply Label
I took this photo just in case I ever needed to refer to it in the future.
The way the power supply is installed, I can't read it without
disassembling everything.
Bigger...
|
|
|
|
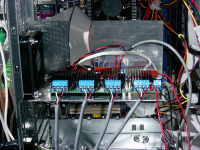
Power Supply Installed
And here's a photo with the new power supply installed. I relocated the
120v connector and fuse and threw my capacitor on the 24v output. I read
somewhere that this was recommended when using switching power supplies.
Since the new
supply had 5v, I connected that up for the Xylotex as well, so now when I
power off the supply, it also completely powers down the Xylotex board so
I can unplug steppers. I was using the power steal cable before, and I had
to powerdown the computer before.
I didn't like the exposed 120v wiring, so I put some heat-shrink over all
of the 120v connectors (not present in this photo).
Bigger...
|
|
|
|
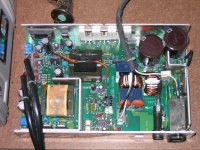
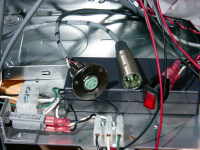
Xylotex Controller
Here we can see the 3-axis plus additional 4th-axis
Xylotex controller boards. There was
a spot on the computer case for mounting an additional fan, so I folded up
some sheet aluminum and mounted it and the fan using the same holes.
Bigger...
|
|
|
|
Connectors
Here's a picture of the XLR connectors that I'm using to plug the steppers
in. The front of the computer case has four half-bays, with only one being
used by the CD-ROM. I'm going to put a faceplate there for all of the
connectors and switches and stuff.
Bigger...
|
|
|
Initially, I'm planning on using
Turbo-CNC (which runs under
DOS) and eventually I
want to try out
EMC (which runs under Linux).
I've already made several partitions on the hard drive and have DOS and
Linux installed so far.
One of the first CNC projects will be the faceplate for mounting all of the
connectors and switches. I'll post a picture once I get that far.
|
|
|
|
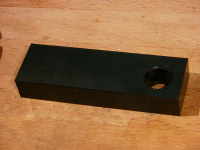
First Project
Well, I finally got all of the motors wired up and got Turbo-CNC working.
My first project was to square off a piece of Delrin and drill/ream a hole.
This is a part for a robot I'm building (i.e. the hole placement is important).
I used the Jog mode to move the fly cutter over the part. I was impressed
with how smooth the surface came out. I've never hard a part come out that
nice by hand.
Bigger...
|
|
|
|
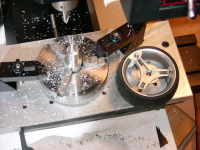
Second Project
The second project was an axle piece to connect to a lego wheel (pictured
on the right). Most of the axle was turned manually on the lathe, but
the 3 angled pieces that interlock with the wheel were done via CNC.
I hand coded the G-Code.
Bigger...
|
|
|
|
|
Home
- Machinist
- CNC
|